4 Ways to High Tech Your Low Tech
Written by:
Manuel Herrera

We all know that students have the ability to learn more when given the opportunity to plan, design and create with their hands. From drafting rough sketches to building prototypes. Yet, in today’s “21st century classroom” we ask students to sit and work in a “collaborative” digital environment that can often times can be solitary and sedentary.
Moving. Talking. Writing. Using our hands. These are what make the creative process happen. We forget how ideas and solutions are developed, tweaked and improved using simple low cost low tech analog tools. When we try to find the next great digital tool, we lose sight of how students are continuing to learn by creating with their hands. Balance is the key and “app smashing” isn’t just for digital tools. Let’s smash the digital with the analog.
Here are four ways that we can high tech our low tech in the classroom.
1. Writable Surfaces
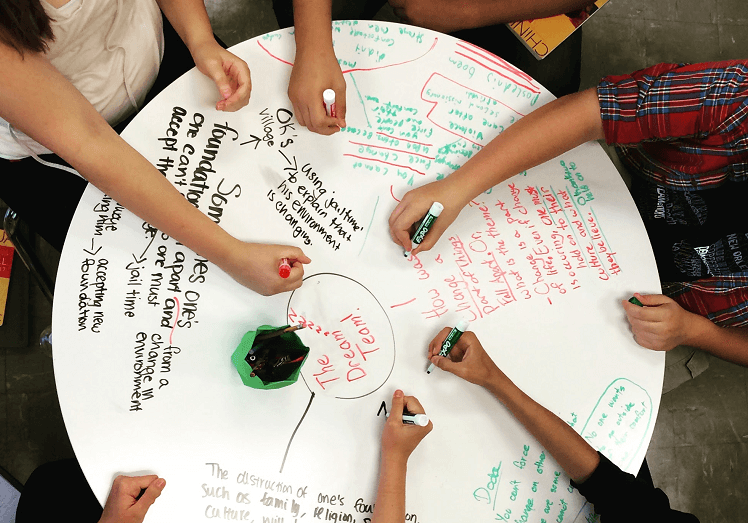
As an educator in a high school setting, I notice students immediately reaching for a device and beginning to start a blank presentation or document as soon as they are assigned a project or task. The creative process is completely missed. Brainstorming is where it begins. It helps a group visually approach a problem and come up with initial solutions in a fast-paced manner.
Writing lists. Sketching ideas. Quickly jotting down questions and thoughts.
By providing large writable surfaces, where together these sketches and lists can quickly be generated, we allow the ideas to flow from students’ minds to their hands to the surface. Good ideas. Bad ideas. Even the absurd ones. Writing it down clears their minds for new thinking.
- Idea walls - large dry erase walls in the room where students can stand and let ideas flow
- T-wall - movable t-shaped walls that are writable and can be used to create small work areas
- Student tables - most table surfaces can be written on with a dry erase marker
App Smash: iOS Paper 53 App to capture surfaces digitally and then further annotate thinking and reference later.

2. Sticky Notes
I’ll start off by saying that I love sites like Padlet or Lino. Even Google Keep. These are the top digital sticky note tools used by many educators today and almost always come up when I discuss this topic. I love them because they do give every student a voice in a class discussion. However, there is just something about a physical sticky note with an idea on it.
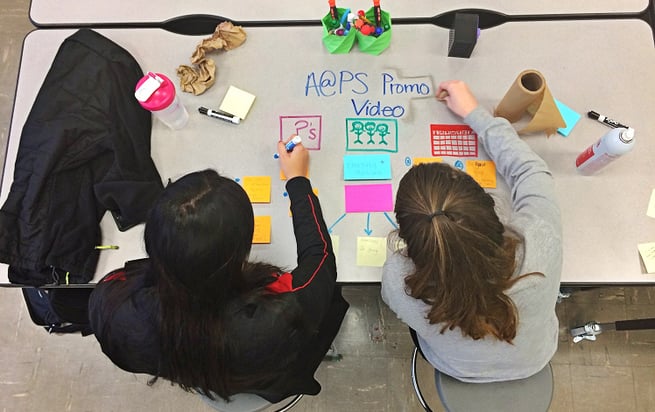
An idea stuck to a table, arranged on a wall or spread out across the floor that drives the creative process. Sticky notes are much like writable surfaces. It’s a place to get those ideas out. The beauty of an idea on a sticky note is that it can be rearranged, ordered, sorted, grouped, linked or even discarded. Other uses for sticky notes:
- Storyboarding videos, presentations or writing
- Combine with writable surfaces to begin mind mapping concepts
- Ask students, “What did you learn today?”
App Smash: Post-it Plus App to digitally capture, store and rearrange notes after a session.
3. Idea (Steal) Journals
After reading Austin Kleon’s book Steal Like an Artist: 10 Things Nobody Told You About Being Creative. I was inspired to continue keeping my journal of ideas and sketches. My original ideas and the stolen ones.
Don’t worry. I’m not encouraging plagiarism. I’m encouraging students to keep physical journals of their ideas, their thinking and their inspirations.
Did you see something that inspired you? Pull out your pocket journal and sketch it. Have a brilliant idea for your project? Open your journal and jot it down.
It goes back to the writable surfaces. Writing things down clears the mind. It also keeps a log of your learning. Yes, we can create a Google Doc or blog post about these things. But there are too many opportunities to hit the delete key. Let ideas flow. Journals aren’t meant display perfection.
App Smash: Your phone’s camera app - Snap a photo and upload to your blog or website. No one said that your blog had to be typed.
4. Raw Materials
Keeping raw materials on hand in your room is a great idea. Why raw materials? Somewhere along the way your students will be creating prototypes for projects. This could be a bio- medical innovation or a replica from the Civil War. However, students should not always be designing a polished product for the masses. So the need for a 3D printer or other form of fabrication isn’t always necessary.
Some cheap low tech material to keep on hand:
- card stock
- adhesive
- string
- cardboard
- fasteners markers
App Smash: Tinkercad. Once a student has prototyped a physical object in raw materials and tested it, they can take the dimensions and create a 3D model in Tinkercad that could then be 3D printed if necessary.
I believe it is important that students learn to create in both the physical and digital worlds. It our job as educators to help those students understand how to choose the right tools for the task.
"In the digital age, don't forget to use your digits! Your hands are the original digital devices. Use them," said Cartoonist Lynda Barry.
While digital tools appear to make things easier it won’t always produce the quality work that can come from using your hands.
Currently, Manuel is the Coordinator of 1:1 Programming for the Affton School District School District in St. Louis, Missouri. He teaches a Technology Solutions and Independent Studies class in his design space, Room 15. He is also a member of the Leadership Team for the educational non-profit ConnectEd Learning. Manuel has presented at conferences throughout Missouri, Texas, Florida and Illinois including SXSWEdu, FETC, METC, various EdCamps, RCET-SW and the ActivEducator conference. Manuel holds his M.Ed Administration. Manuel can be found on Twitter at @manuelherrera33.
Affton School District is a Kajeet customer.
Tag(s):

